
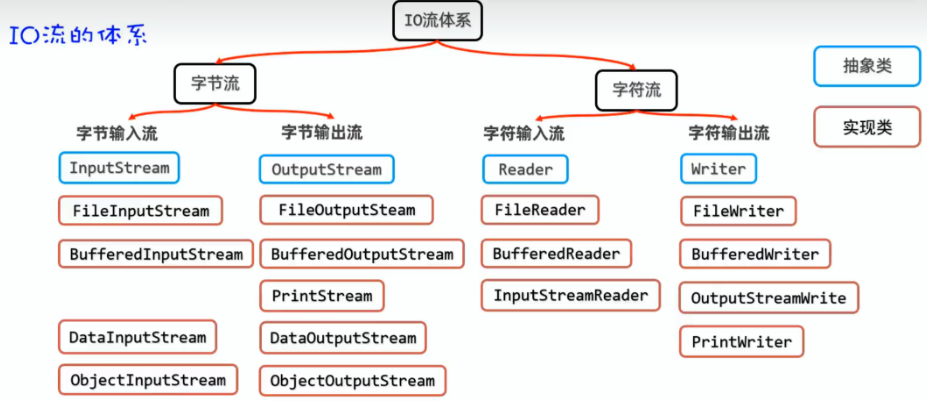
IO体系结构
一,缓冲流
1.1 缓冲流体系结构
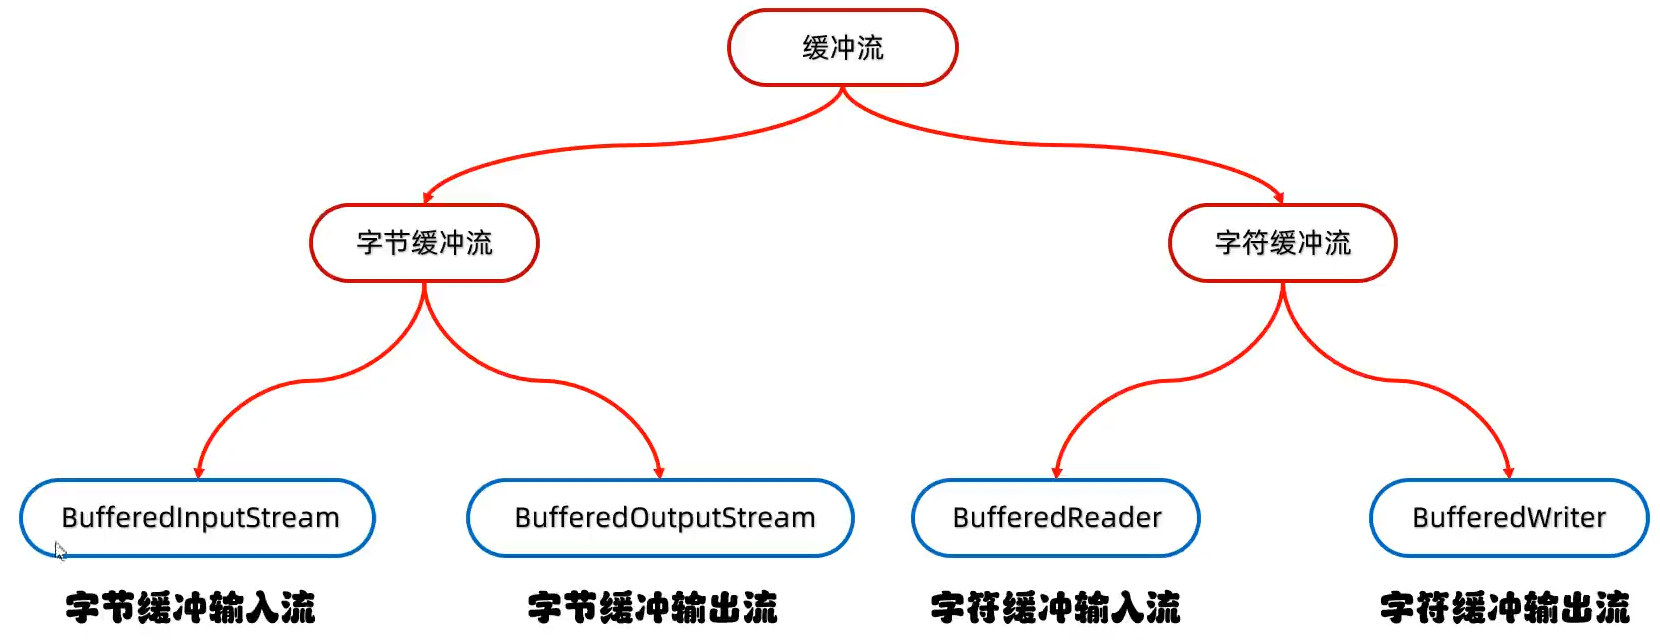
1.2 字节缓冲流
原理:底层自带了长度为8kb的缓冲区提高性能。利用缓冲区可以一次读取 8kb 数据提高了缓冲效率。
缓冲流的核心思想是使用内存缓冲区来减少对底层资源(如硬盘、网络)的直接访问次数,从而提高 I/O 效率。
构造方法:
| 方法名 | 说明 |
|---|---|
| public BufferedInputStream(InputStream is) | 把基本流装成高级流,提高读取数据的性能 |
| public BufferedOutputStream(OutputStream os) | 把基本流装成高级流,提高写出数据的性能 |
缓冲流本身是不能直接操作文件中的数据的,是在创建对象的时候关联了基本流,真正的读写数据的还是被关联的那个基本流。只不过通过缓冲流让这个基本流读写效率更高了。
这个构造方法的参数是抽象类,使用字节输入流字节输出流对应的实现类用多态即可。
字节缓冲流的写入和读取都是和字节流一模一样的,只是额外提供了读取性能而已。
-
字节缓冲流读写原理
缓冲流实际上还是由基本流进行数据的读取的。
但是基本流会一次性读取
8192个数据交给缓冲流中的缓冲区。缓冲输入流的缓冲区和缓冲输出流的缓冲区不是同一个缓冲区,而是各自有一个缓冲区。
当右边的缓冲区读取完了
8192个数据,左边的缓冲区就会继续读取 8192 个数据。变量 b 就是来回搬运数据的。

虽然两个缓冲区之间也是 1 个字节 1 个字节的交换,但是这是在内存中进行的交换!内存的运输速度极快。
缓冲流节约的是内存和硬盘之间交互浪费的时间。
当然变量 b 也可也是数组,如果使用数组的话,就一次性一共数组的最大长度进行交换缓冲区间数据了。速度更加快了。
1.3 字符缓冲流
原理:底层自带了长度为8kb的缓冲区提高性能。但是字符流的底层本身就带了 8kb 的缓冲区,故提高的效率不是很明显。
字符缓冲流构造方法:
| 方法名 | 说明 |
|---|---|
| public BufferedReader(Reader r) | 把基本流变为高级流 |
| public BufferedWriter(Writer w) | 把基本流变为高级流 |
字符缓冲输入流特有的方法
| 方法名 | 说明 |
|---|---|
| public String readLine() | 读取一行数据,如果没有数据可读了,返回null |
遇到 \r \n 的时候才会停止读取。 即这个虽然一次读取一行数据,但是不会读取到回车换行!
字符缓冲输出流特有的方法
| 方法名 | 说明 |
|---|---|
| public void newLine() | 跨平台的换行 |
因为不同的平台换行符号是不一样的。
细节 :缓冲流的续写功能是在 Writer 里面开启的!BufferedWriter 是没有续写功能的
1.4 字节数组和缓冲流
字节数组和缓冲流的区别:
-
字节数组读取
// 你:给我8192个字节! byte[] buffer = new byte[8192]; int count = inputStream.read(buffer); // 一次最多拿8192个 // 拿回来就必须处理这整个数组(即使你只需要第一个字节) -
缓冲流读取
// 缓冲流内部:我先偷偷读取8192个字节到我的"秘密仓库"
// 然后你调用read()时:
while ((data = bufferedStream.read()) != -1) {
    // 实际上是从"秘密仓库"里一个一个给你
    // 仓库空了再去底层流补货
}
关键差异:谁负责缓冲逻辑?
| 特性 | 字节数组参数 | 缓冲流 |
|---|---|---|
| 缓冲逻辑 | 你在代码中写循环管理 | 缓冲流类内部实现 |
| 读取粒度 | 必须以数组为单位 | 可以按字节/字符/行读取 |
| 缓冲透明度 | 完全透明,你看到所有数据 | 不透明,你看不到缓冲过程 |
二,转换流
2.1 什么是转换流
转化流是字符流的高级流。属于字符流。
转换流是字符流和字节流的桥梁。
-
InputStreamReader:- 作用:解决不同编码时,字节流读取文本内容乱码的问题。
- 解决思路:先获取文件的原始字节流,再将其按真实的字符集编码转成字符输入流,这样字符输入流中的字符就不乱码了,
-
OutputStreamWriter:- 作用:可以控制写出去的字符使用什么字符集编码
- 解决思路:获取字节输出流,再按照指定的字符集编码将其转换成字符输出流,以后写出去的字符就会用该字符集编码了
构造方法:
| 方法名 | 说明 |
|---|---|
| public InputStreamReader(InputStream e,String charsetName) | 创建对象并指定读取文本的字符编码 |
| public OutputStreamWriter(OutputStream e,String charSetName) | 创建对象并指定输出文本的字符编码 |
注:转换流虽然可以指定字符编码,但是在 jdk11 的时候可以直接使用字符流进行替代了。
转换流是 Java I/O 中字节流和字符流之间的桥梁,解决编码问题。
核心功能:字节 ↔ 字符的转换
// 字节流的世界               // 字符流的世界
FileInputStream  ---转换--->  Reader
(原始字节)       InputStreamReader (字符,带编码)
2.2 代码举例
问题场景:读取文本文件
// 错误做法:直接用字节流读文本
FileInputStream fis = new FileInputStream("中文.txt");
int data;
while ((data = fis.read()) != -1) {
    System.out.print((char) data);  //  中文乱码!
}
// 原因:一个中文字符可能是2-4个字节,逐字节转char会出错
基本用法
// 1. 读取文本文件(字节→字符)
FileInputStream fis = new FileInputStream("file.txt");
// 关键:指定编码转换
InputStreamReader reader = new InputStreamReader(fis, "UTF-8");

// 现在可以按字符读取了
int ch;
while ((ch = reader.read()) != -1) {
    System.out.print((char) ch);  // 正确显示中文
}

// 2. 写入文本文件(字符→字节)
FileOutputStream fos = new FileOutputStream("output.txt");
OutputStreamWriter writer = new OutputStreamWriter(fos, "GBK");
writer.write("你好世界");  // 按GBK编码写入字节
writer.close();
编码问题的关键
// 不同编码,转换结果完全不同
String text = "你好";

// UTF-8编码:每个中文通常3字节
byte[] utf8Bytes = text.getBytes("UTF-8");  // [-28, -67, -96, -27, -91, -67]

// GBK编码:每个中文2字节
byte[] gbkBytes = text.getBytes("GBK");  // [-60, -29, -70, -61]

// ISO-8859-1:根本不支持中文!
byte[] isoBytes = text.getBytes("ISO-8859-1");  // [63, 63] 变成??

// 转换流帮你正确处理这些
实际工作流示例
// 从GBK编码文件读取,转换为UTF-8输出
try (
    FileInputStream fis = new FileInputStream("gbk_file.txt");
    // 按源文件编码读取
    InputStreamReader reader = new InputStreamReader(fis, "GBK");

    FileOutputStream fos = new FileOutputStream("utf8_file.txt");
    // 按目标编码写入
    OutputStreamWriter writer = new OutputStreamWriter(fos, "UTF-8")
) {
    char[] buffer = new char[1024];
    int charsRead;

    while ((charsRead = reader.read(buffer)) != -1) {
        writer.write(buffer, 0, charsRead);  // 自动转换编码
    }
    // 完成了 GBK → UTF-8 的转换
}
与缓冲流的配合
// 最佳实践:转换流 + 缓冲流
// 读取文本文件的黄金组合
try (BufferedReader reader = new BufferedReader(
        new InputStreamReader(
            new FileInputStream("large.txt"),
            StandardCharsets.UTF_8  // Java 7+ 推荐方式
        ),
        8192  // 缓冲区大小
    )) {

    String line;
    while ((line = reader.readLine()) != null) {  // 按行读取
        System.out.println(line);
    }
}
2.3 常见编码及其特点
| 编码 | 特点 | 适用场景 |
|---|---|---|
| UTF-8 | 变长(1-4字节),兼容ASCII | 现代Web,国际化 |
| GBK/GB2312 | 中文固定2字节 | 中文Windows系统文件 |
| ISO-8859-1 | 单字节,只支持西欧 | 旧的英文系统 |
| UTF-16 | 固定2或4字节 | Java内存String内部 |
| UTF-16BE/LE | 带字节序标记 | 特定需求 |
2.4 常见错误和解决
// 错误:不指定编码(使用平台默认)
InputStreamReader reader = new InputStreamReader(fis);
// 在中文Windows可能是GBK,在Linux可能是UTF-8 ❌

// 正确:显式指定编码
InputStreamReader reader = new InputStreamReader(fis, "UTF-8");  // ✅

// Java 7+ 推荐方式
import java.nio.charset.StandardCharsets;
InputStreamReader reader = new InputStreamReader(fis, StandardCharsets.UTF_8);
2.5 转换流的"转换"在哪里?
// 1. 输入转换流(InputStreamReader)
// 底层:字节流 → (按指定编码解码) → 字符流
public class InputStreamReader extends Reader {
    private final StreamDecoder sd;  // 真正的解码器

    public int read() throws IOException {
        return sd.read();  // 这里发生字节→字符的转换
    }
}

// 2. 输出转换流(OutputStreamWriter)
// 底层:字符流 → (按指定编码编码) → 字节流
public class OutputStreamWriter extends Writer {
    private final StreamEncoder se;  // 编码器

    public void write(int c) throws IOException {
        se.write(c);  // 这里发生字符→字节的转换
    }
}
2.6 总结
转换流的核心作用:
- 编码解码:在字节和字符之间转换,处理乱码问题
- 指定编码:明确告诉Java用什么字符集解析/生成字节
- 桥梁作用:连接字节流世界和字符流世界
一句话记住:
- 字节流:处理所有文件(图片、视频、文本)
- 字符流:专门处理文本,更方便
- 转换流:让字节流变成字符流,并解决编码问题
类比:
- 字节流 → 原料(面粉、水)
- 转换流 → 厨师(按菜谱把原料做成菜)
- 字符流 → 成品菜(可以直接享用)
所以当你需要读取文本文件时,几乎总是需要转换流(或它的包装类如 FileReader,它内部就是转换流)
三,数据流
3.1 数据流介绍
Data 数据流是专门用于读写 Java 基本数据类型的流,保持数据的类型和值不变。
核心特点:保留数据类型
// 普通字节流:只能读写字节
// Data流:可以读写 int, double, boolean 等
为什么需要 Data 流?
-
问题:如何保存一个学生的信息?
String name = "张三"; int age = 20; double score = 89.5; boolean passed = true; // 用普通字节流存?太麻烦了! // 1. 要把name转字节数组 // 2. 要把int拆成4个字节 // 3. 要把double拆成8个字节 // 4. 要自己记录每个字段的长度... // 用Data流:一行搞定! dataOutputStream.writeUTF(name); dataOutputStream.writeInt(age); dataOutputStream.writeDouble(score); dataOutputStream.writeBoolean(passed); -
关键特性:平台无关的二进制格式
// Data流写入的数据是平台无关的!
// 无论在Windows、Linux还是Mac,写入的int都是4字节
// 而且使用"网络字节序"(大端序,big-endian)

// 大端序:高位在前
int value = 0x12345678;
// 内存布局:[12][34][56][78](高位→低位)
// 网络传输标准,Java统一使用
3.2 基本读写操作
// 写入基本数据类型
try (DataOutputStream dos = new DataOutputStream(
        new FileOutputStream("student.dat"))) {

    dos.writeUTF("张三");      // 写入字符串(UTF-8编码)
    dos.writeInt(20);         // 写入int(4字节)
    dos.writeDouble(89.5);    // 写入double(8字节)
    dos.writeBoolean(true);   // 写入boolean(1字节)
    dos.writeChar('A');       // 写入char(2字节)
}

// 读取时保持类型
try (DataInputStream dis = new DataInputStream(
        new FileInputStream("student.dat"))) {

    String name = dis.readUTF();      // 按字符串读
    int age = dis.readInt();          // 按int读
    double score = dis.readDouble();  // 按double读
    boolean passed = dis.readBoolean();
    char grade = dis.readChar();

    System.out.printf("姓名:%s, 年龄:%d, 分数:%.1f%n",
                     name, age, score);
}
3.3 Data流的特殊方法
| 方法 | 写入大小 | 说明 |
|---|---|---|
writeBoolean(boolean v) | 1字节 | true=1, false=0 |
writeByte(int v) | 1字节 | 写入低8位 |
writeShort(int v) | 2字节 | 写入低16位 |
writeChar(int v) | 2字节 | Unicode字符 |
writeInt(int v) | 4字节 | 整型 |
writeLong(long v) | 8字节 | 长整型 |
writeFloat(float v) | 4字节 | 单精度浮点 |
writeDouble(double v) | 8字节 | 双精度浮点 |
writeUTF(String s) | 变长 | UTF-8字符串(前2字节长度) |
3.4 注意事项
-
严格的读写顺序
// 写入顺序和读取顺序必须完全一致! dos.writeUTF("张三"); dos.writeInt(20); dos.writeDouble(95.5); // 读取也必须按这个顺序 String name = dis.readUTF(); // ✅ int age = dis.readInt(); // ✅ double score = dis.readDouble();// ✅ // 如果顺序错了 int wrong = dis.readInt(); // ❌ 会把字符串长度当int读! -
EOF 检测
// DataInputStream没有直接的hasNext()方法 // 通常有以下几种方式: try { while (true) { String data = dis.readUTF(); // 处理数据... } } catch (EOFException e) { // 到达文件末尾,正常结束 System.out.println("文件读取完毕"); } -
UTF-8 字符串的特殊处理
// writeUTF()不是简单的字符串转UTF-8! // 它在字符串前面加了2字节的长度信息 String text = "Hello"; // 普通UTF-8编码:[H][e][l][l][o] (5字节) // DataOutputStream.writeUTF(): // [0][5][H][e][l][l][o] (7字节,前2字节是长度) // 所以不能用普通UTF-8解码Data流写的字符串 -
数据流的核心是在于配合 java 的 Socket 去读写自定义的网络协议
// 客户端发送数据包
Socket socket = new Socket("server", 8888);
DataOutputStream dos = new DataOutputStream(
    socket.getOutputStream());

// 协议格式:类型(1字节) + 长度(4字节) + 数据
dos.writeByte(1);              // 消息类型:登录
dos.writeUTF("username");      // 用户名
dos.writeUTF("password");      // 密码
dos.writeLong(System.currentTimeMillis()); // 时间戳

// 服务器端读取
DataInputStream dis = new DataInputStream(
    socket.getInputStream());
byte msgType = dis.readByte();
if (msgType == 1) {  // 登录消息
    String username = dis.readUTF();
    String password = dis.readUTF();
    long timestamp = dis.readLong();
    // 处理登录逻辑...
}
四,序列化流
4.1 序列化流介绍
序列化流是 Java 中把对象变成字节流,再从字节流恢复对象
核心功能:对象 ↔ 字节的转换
// 序列化:对象 → 字节流(保存/传输)
ObjectOutputStream oos = new ObjectOutputStream(outputStream);
oos.writeObject(user);  // 把对象变成字节流

// 反序列化:字节流 → 对象(读取/接收)
ObjectInputStream ois = new ObjectInputStream(inputStream);
User user = (User) ois.readObject();  // 把字节流变回对象
4.2 基本用法
4.2.1 ObjectOutputStream
作用:可以把 java 中的对象写到本地文件中。
写出的数据有个特点:人无法读取,需要通过反序列化流来读取。
构造方法:
| 构造方法 | 说明 |
|---|---|
| public ObjectOutputStream(OutputStream out) | 构造一个序列化流 |
小细节:如果直接使用序列化流去把对象序列化会报异常:NotSerializableException
- 解决方法:需要让被序列化的那个javabean实现
Serializable接口
注:
Serializable这个接口是没有抽象方法的,这种接口叫标记接口,一旦实现了这种接口,那么就表示当前的类可以被序列化。如果需要指定字段不进行序列化就在对应的属性前面加上关键字
transient
方法:
| 方法名 | 说明 |
|---|---|
| public final void writeObject(Object obj) | 把对象序列化(写出去)到文件中 |
4.2.2 ObjectInputStream
作用:把序列化到本地文件中的对象,读取到程序中。
构造方法:
| 构造方法 | 说明 |
|---|---|
| public ObjectInputStream(InputStream out) | 把基本流变成高级流 |
方法:
| 方法名 | 说明 |
|---|---|
| public Object readObject() | 把序列化到本地文件中的对象,读取到程序中 |
细节:这个返回值是 Object 类型的,如果想要获得对象真正的类型,需要进行强制类型转换。
4.3 注意要点
如果一个 javabean 类继承了 Serializable 接口。那么 java 会对这个类所有内容进行计算获得一个序列号。
如果已经序列化了这个类后,再对这个类进行修改,此时会得到新的版本号。如果此时使用反序列化。那么由于序列号不一致会导致异常的出现。
解决办法:固定这个序列号
// 非常重要!用于版本兼容性
private static final long serialVersionUID = 1L;

// 如果不指定,JVM会自动生成
// 问题:类结构改变时,自动生成的UID会变,导致反序列化失败!

// 示例:
class User implements Serializable {
    // 版本1
    private static final long serialVersionUID = 1L;
    String name;
    int age;
}

// 后来添加了字段
class User implements Serializable {
    // 还是版本1(兼容旧数据)
    private static final long serialVersionUID = 1L;  // 保持不变!
    String name;
    int age;
    String email;  // 新增字段
    // 反序列化旧数据时,email为null(安全)
}
问题:如果对象中有一个成员属性不想序列化到本地
解决方法:加上transient 关键字即可
public class Student implements Serializable{
    private static final long serialVersionUID=1L;//这样就可以固定序列号,必须这么写不能改
    private transient String name;//加上这个关键字这个属性就不会序列化到本地文件中
    ...
}
问题:将多个对象序列化,解决如何多个反序列化。
public class a {
    public static void main(String[] args) throws IOException, ClassNotFoundException {
        Student s1=new Student(23,"张三");
        Student s2=new Student(13,"李四");
        Student s3=new Student(43,"王五");
        ArrayList<Student> list=new ArrayList<>();//将要序列化的对象存入集合中,序列化这个集合即可解决
        list.add(s1);
        list.add(s2);
        list.add(s3);
        ObjectOutputStream oos=new ObjectOutputStream(new FileOutputStream("3.txt"));
        oos.writeObject(list);
        oos.close();

        ObjectInputStream ois=new ObjectInputStream(new FileInputStream("3.txt"));
        ArrayList<Student> l1=(ArrayList<Student>)ois.readObject();
        System.out.println(l1);
        ois.close();
    }
}
五,打印流
5.1 打印流介绍
什么是打印流?:打印流是 Java 提供的专门用于方便输出的工具类,它能
- 自动将各种数据类型转换为字符串输出
- 自动处理换行符(跨平台兼容)
- 提供格式化输出(类似C语言的printf)
- 简化异常处理(不抛出IOException)
为什么需要打印流?:
-
为了解决原始输出太麻烦的问题
没有打印流时
// 输出一个带格式的字符串
FileOutputStream fos = new FileOutputStream("output.txt");
fos.write("姓名: ".getBytes());
fos.write(name.getBytes());
fos.write(", 年龄: ".getBytes());
fos.write(String.valueOf(age).getBytes());
fos.write(System.lineSeparator().getBytes()); // 手动换行
// 还要处理异常...
使用打印流后
PrintStream ps = new PrintStream("output.txt");
ps.printf("姓名: %s, 年龄: %d%n", name, age); // 一行搞定
// 自动换行、自动类型转换、异常简化
5.1 字节打印流
字节打印流是默认自动刷新的
构造方法:
| 构造方法 | 说明 |
|---|---|
| public PrintStream(OutputStream/File/String) | 关联字节输出流/文件/文件路径 |
| public PrintStream(String fileName, Charset charset) | 指定字符编码 |
| public PrintStream(OutputStream out,boolean autoFlush) | 自动刷新 |
| public PrintStream(OutputStream out,boolean autoFlush, String encoding) | 指定字符编码并且自动刷新 |
成员方法:
| 成员方法 | 说明 |
|---|---|
| public void write(int b) | 常规方法:规则和之前一样,将指定的字节写出 |
| public void println(Xxx xx) | 特有方法:打印任意数据,自动刷新,自动换行 |
| public void print(Xxx xx) | 特有方法:打印任意数据,不换行 |
| public void printf(String format,Object... args) | 特有方法:带有占位符的打印语句,不换行 |
举例:
public class a {
    public static void main(String[] args) throws FileNotFoundException, UnsupportedEncodingException {

        PrintStream ps=new PrintStream(new BufferedOutputStream(new FileOutputStream("1.txt",true)),true,"GBK");
        //这里创建方法中因为是父类OutputStream故参数可以写这个父类里面的所有子类
        //最里面的true,是字节输出流的true,表示开启续写功能
        //之所以写BufferedOutputStream是因为这个让字节打印流有缓冲区,从而可以实现自动刷新功能
        ps.printf("%s helllo world","你好");
        ps.print(11);//直接打印的就是11
        ps.println(true);//直接打印的就是true
        ps.close();

    }
}
5.2 字符打印流
字符打印流和字节打印流的区别就是,字符打印流底层多了缓冲区,想要刷新需要开启。
构造方法:
| 构造方法 | 说明 |
|---|---|
| public PrintWriter(OutputStream/Writer/File/String) | 关联字节输出/文件/文件路径 |
| public PrintWriter(String fileName, Charset charset) | 指定字符编码 |
| public PrintWriter(Write w, boolean autoFlush) | 自动刷新 |
| public PrintWriter(OutputStream out, boolean autoFlush, Charset charset) | 指定字符编码并自动刷新 |
成员方法:和字节打印流一模一样
PrintStream 和 PrintWriter 的区别
- 打印数据的功能上是一模一样的:都是使用方便,性能高效(核心优势)
- PrintStream继承自字节输出流OutputStream,因此支持写字节数据的方法。
- PrintWriter继承自字符输出流Writer,因此支持写字符数据出去。
5.3 打印流和输出语句的关系
输出语句里面的System.out.printkn中out是一个字节打印流类型,即public static final PrintStream out=null这样的形式在 System 类中展示的。这样打印流默认指向控制台。
举例:
//获取打印流对象,此打印流在虚拟机启动时,由虚拟机创建,默认指向控制台。
//特殊的打印流:系统中的标准输出流
//标准输出流是不能关闭额,在系统中是唯一的!
PrintStream os=System.out;
//调用打印流中的方法
//写出数据,自动换行,自动刷新
ps.println("123");
ps.close();//关闭了系统标准输出流后!下面的方法就不能执行了
System.out.println("123");//就是上面的方法,用链式编程搞出来的

PrintStream os=new PrintStream("/1.txt");
System.setOut(ps);//输出语句重定向
5.4 打印流的特点
-
. 自动处理换行符(跨平台!)
// PrintStream:自动适配操作系统换行符 PrintStream ps = new PrintStream("file.txt"); ps.println("Line 1"); // Windows: \r\n, Linux: \n, Mac: \r ps.println("Line 2"); ps.println("Line 3"); // 手动处理换行符多麻烦? String lineSeparator = System.getProperty("line.separator"); // 或者 String lineSeparator = System.lineSeparator(); // 每次写都要拼接:content + lineSeparator -
永远不会抛出 IOException
// 普通流:要处理IOException try { FileOutputStream fos = new FileOutputStream("file.txt"); fos.write(data); fos.close(); } catch (IOException e) { // 必须处理 } // PrintStream:不抛受检异常! PrintStream ps = new PrintStream("file.txt"); ps.println("Hello"); // 不需要try-catch! ps.close(); // 也不抛IOException // 怎么知道出错了? if (ps.checkError()) { // 检查错误标志 System.out.println("写入出错!"); } -
自动刷新(Auto-flush)
// 创建自动刷新的PrintStream PrintStream ps = new PrintStream( new FileOutputStream("log.txt"), true // autoFlush = true ); ps.println("Log entry 1"); // 自动调用flush() ps.println("Log entry 2"); // 数据立即写入,不会在缓冲区等待 ps.println("Log entry 3"); // 对比:普通OutputStream需要手动flush OutputStream os = new FileOutputStream("log.txt"); os.write("Log entry 1\n".getBytes()); os.flush(); // 必须手动调用! -
格式化
PrintStream ps = System.out;  // System.out就是PrintStream!

// 1. printf格式化(C语言风格)
ps.printf("姓名: %s, 年龄: %d, 成绩: %.2f%n",
          "张三", 20, 95.5);

// 2. format格式化(Java风格)
ps.format("时间: %tT, 日期: %tF%n",
          new Date(), new Date());

// 3. 各种格式化选项
ps.printf("十六进制: %x, 八进制: %o%n", 255, 255);  // ff, 377
ps.printf("科学计数: %e%n", 1234567.89);  // 1.234568e+06
ps.printf("金额: %,.2f元%n", 1234567.89);  // 1,234,567.89元
ps.printf("宽度对齐: [%-10s][%10s]%n", "左对齐", "右对齐");

// 手动格式化得写多少代码?
String formatted = String.format("姓名: %s", name);
// 再手动write...
六,解压缩流与压缩流
6.1 介绍
压缩流是能将数据自动压缩和解压缩的流,就像给你的数据“打包”和“拆包”。
为什么需要压缩流?:为了节省空间和提高传输效率:
-
没有压缩时:
// 10MB的文件 → 传输需要10MB带宽,存储需要10MB空间 -
使用压缩后:
// 10MB的文件 → 压缩后可能只有2MB
// 节省80%的空间和传输时间!
两种主要压缩流:
-
GZIP 压缩流(单个文件)
// 压缩 GZIPOutputStream gzos = new GZIPOutputStream( new FileOutputStream("file.gz")); // 写入数据会自动压缩 // 解压 GZIPInputStream gzis = new GZIPInputStream( new FileInputStream("file.gz")); // 读取数据会自动解压 -
ZIP 压缩流(多个文件)
// 创建ZIP文件
ZipOutputStream zos = new ZipOutputStream(
    new FileOutputStream("archive.zip"));

// 添加文件1
zos.putNextEntry(new ZipEntry("file1.txt"));
zos.write(file1Data);

// 添加文件2
zos.putNextEntry(new ZipEntry("file2.txt"));
zos.write(file2Data);

zos.close();
6.2 GZIP压缩流(单个文件压缩)
GZIP 是用于单个文件压缩的标准格式,常用于:
- HTTP响应压缩(Content-Encoding: gzip)
- Linux系统压缩文件(.gz后缀)
- 日志文件压缩
GZIP 压缩示例
import java.io.*;
import java.util.zip.*;

public class GzipExample {

    // 压缩单个文件
    public static void compressFile(String sourceFile, String destFile)
            throws IOException {
        try (FileInputStream fis = new FileInputStream(sourceFile);
             FileOutputStream fos = new FileOutputStream(destFile);
             GZIPOutputStream gzos = new GZIPOutputStream(fos)) {

            byte[] buffer = new byte[1024];
            int len;
            while ((len = fis.read(buffer)) != -1) {
                gzos.write(buffer, 0, len);
            }
            System.out.printf("压缩完成:%s → %s (%.2f%%压缩率)%n",
                sourceFile, destFile,
                (1 - new File(destFile).length() * 1.0 / new File(sourceFile).length()) * 100);
        }
    }

    // 解压缩文件
    public static void decompressFile(String sourceFile, String destFile)
            throws IOException {
        try (GZIPInputStream gzis = new GZIPInputStream(
                new FileInputStream(sourceFile));
             FileOutputStream fos = new FileOutputStream(destFile)) {

            byte[] buffer = new byte[1024];
            int len;
            while ((len = gzis.read(buffer)) != -1) {
                fos.write(buffer, 0, len);
            }
            System.out.printf("解压完成:%s → %s%n", sourceFile, destFile);
        }
    }

    // 压缩字符串(常用于网络传输)
    public static byte[] compressString(String data) throws IOException {
        ByteArrayOutputStream baos = new ByteArrayOutputStream();
        try (GZIPOutputStream gzos = new GZIPOutputStream(baos)) {
            gzos.write(data.getBytes("UTF-8"));
        }
        return baos.toByteArray();
    }

    // 解压字符串
    public static String decompressString(byte[] compressedData) throws IOException {
        ByteArrayInputStream bais = new ByteArrayInputStream(compressedData);
        ByteArrayOutputStream baos = new ByteArrayOutputStream();
        try (GZIPInputStream gzis = new GZIPInputStream(bais)) {
            byte[] buffer = new byte[1024];
            int len;
            while ((len = gzis.read(buffer)) != -1) {
                baos.write(buffer, 0, len);
            }
        }
        return baos.toString("UTF-8");
    }

    public static void main(String[] args) throws IOException {
        // 示例:压缩文本文件
        String text = "这是一段需要压缩的文本数据,重复数据重复数据重复数据...";
        Files.write(Paths.get("original.txt"), text.getBytes("UTF-8"));

        // 压缩
        compressFile("original.txt", "compressed.gz");

        // 解压
        decompressFile("compressed.gz", "decompressed.txt");

        // 字符串压缩示例
        String original = "Hello ".repeat(1000); // 重复数据压缩率高
        byte[] compressed = compressString(original);
        String decompressed = decompressString(compressed);

        System.out.printf("原始大小:%d bytes%n", original.getBytes("UTF-8").length);
        System.out.printf("压缩后:%d bytes%n", compressed.length);
        System.out.printf("压缩率:%.1f%%%n",
            (1 - compressed.length * 1.0 / original.getBytes("UTF-8").length) * 100);
    }
}
GZIP 的特点
- 只能压缩单个文件(不能包含多个文件)
- 压缩率高,特别是文本文件
- 无目录结构,只能压缩文件内容
- 自动添加.gz扩展名
- 需要先创建GZIPOutputStream,再写入数据
6.3 ZIP压缩流(多个文件)
ZIP 是支持多文件和目录结构的压缩格式,常用于:
- 打包多个文件(如作业提交)
- 软件分发(.zip安装包)
- 备份目录结构
ZIP 压缩示例
import java.io.*;
import java.nio.file.*;
import java.util.zip.*;
import java.util.*;

public class ZipExample {

    // 压缩单个文件到ZIP
    public static void zipSingleFile(String sourceFile, String zipFile)
            throws IOException {
        try (ZipOutputStream zos = new ZipOutputStream(
                new FileOutputStream(zipFile))) {

            File fileToZip = new File(sourceFile);
            FileInputStream fis = new FileInputStream(fileToZip);

            // 创建ZIP条目(文件入口)
            ZipEntry zipEntry = new ZipEntry(fileToZip.getName());
            zos.putNextEntry(zipEntry);

            byte[] buffer = new byte[1024];
            int len;
            while ((len = fis.read(buffer)) != -1) {
                zos.write(buffer, 0, len);
            }

            fis.close();
            zos.closeEntry();
        }
    }

    // 压缩整个目录(递归)
    public static void zipDirectory(String sourceDir, String zipFile)
            throws IOException {
        try (ZipOutputStream zos = new ZipOutputStream(
                new FileOutputStream(zipFile))) {

            Path sourcePath = Paths.get(sourceDir);
            Files.walk(sourcePath)
                 .filter(path -> !Files.isDirectory(path))
                 .forEach(path -> {
                     try {
                         // 获取相对路径(保持目录结构)
                         String relativePath = sourcePath.relativize(path).toString();

                         ZipEntry zipEntry = new ZipEntry(relativePath);
                         zos.putNextEntry(zipEntry);

                         Files.copy(path, zos);
                         zos.closeEntry();

                         System.out.println("已添加:" + relativePath);
                     } catch (IOException e) {
                         e.printStackTrace();
                     }
                 });
        }
    }

    // 压缩多个指定文件
    public static void zipMultipleFiles(List<String> files, String zipFile)
            throws IOException {
        try (ZipOutputStream zos = new ZipOutputStream(
                new FileOutputStream(zipFile))) {

            for (String filePath : files) {
                File file = new File(filePath);
                FileInputStream fis = new FileInputStream(file);

                ZipEntry zipEntry = new ZipEntry(file.getName());
                zos.putNextEntry(zipEntry);

                byte[] buffer = new byte[1024];
                int len;
                while ((len = fis.read(buffer)) != -1) {
                    zos.write(buffer, 0, len);
                }

                fis.close();
                zos.closeEntry();
            }
        }
    }

    // 解压ZIP文件
    public static void unzipFile(String zipFile, String destDir)
            throws IOException {
        File destDirectory = new File(destDir);
        if (!destDirectory.exists()) {
            destDirectory.mkdirs();
        }

        try (ZipInputStream zis = new ZipInputStream(
                new FileInputStream(zipFile))) {

            ZipEntry zipEntry;
            while ((zipEntry = zis.getNextEntry()) != null) {
                String fileName = zipEntry.getName();
                File newFile = new File(destDir + File.separator + fileName);

                // 创建必要的目录结构
                if (zipEntry.isDirectory()) {
                    newFile.mkdirs();
                    continue;
                } else {
                    newFile.getParentFile().mkdirs();
                }

                // 解压文件
                try (FileOutputStream fos = new FileOutputStream(newFile)) {
                    byte[] buffer = new byte[1024];
                    int len;
                    while ((len = zis.read(buffer)) != -1) {
                        fos.write(buffer, 0, len);
                    }
                }

                System.out.println("解压:" + fileName);
                zis.closeEntry();
            }
        }
    }

    // 查看ZIP文件内容(不解压)
    public static void listZipContents(String zipFile) throws IOException {
        try (ZipInputStream zis = new ZipInputStream(
                new FileInputStream(zipFile))) {

            System.out.println("ZIP文件内容:");
            System.out.println("====================");

            ZipEntry zipEntry;
            while ((zipEntry = zis.getNextEntry()) != null) {
                String info = String.format("%-40s %10d bytes %s",
                    zipEntry.getName(),
                    zipEntry.getSize(),
                    zipEntry.isDirectory() ? "[目录]" : "");
                System.out.println(info);

                // 跳过文件内容,只读取元数据
                byte[] buffer = new byte[1024];
                while (zis.read(buffer) != -1) {
                    // 只读取,不处理
                }
                zis.closeEntry();
            }
        }
    }

    // 压缩并设置密码(需要额外的库,如zip4j)
    public static void zipWithPassword(String sourceFile, String zipFile, String password) {
        // 注意:Java原生ZIP不支持密码,需要第三方库
        System.out.println("Java原生ZIP库不支持加密,需要使用zip4j等第三方库");
    }

    public static void main(String[] args) throws IOException {
        // 准备测试文件
        Files.write(Paths.get("doc1.txt"),
                   "这是文档1的内容".getBytes("UTF-8"));
        Files.write(Paths.get("doc2.txt"),
                   "这是文档2的内容".getBytes("UTF-8"));
        Files.write(Paths.get("data.csv"),
                   "姓名,年龄,成绩\n张三,20,95\n李四,22,88".getBytes("UTF-8"));

        // 创建测试目录
        new File("testdir").mkdir();
        Files.write(Paths.get("testdir/image.png"),
                   new byte[1024]); // 模拟图片文件

        // 示例1:压缩单个文件
        zipSingleFile("doc1.txt", "single.zip");

        // 示例2:压缩多个文件
        List<String> files = Arrays.asList("doc1.txt", "doc2.txt", "data.csv");
        zipMultipleFiles(files, "multiple.zip");

        // 示例3:压缩目录
        zipDirectory(".", "alldir.zip");

        // 示例4:查看ZIP内容
        listZipContents("multiple.zip");

        // 示例5:解压
        unzipFile("multiple.zip", "extracted");

        // 清理测试文件
        Files.deleteIfExists(Paths.get("doc1.txt"));
        Files.deleteIfExists(Paths.get("doc2.txt"));
        Files.deleteIfExists(Paths.get("data.csv"));
        Files.deleteIfExists(Paths.get("single.zip"));
        Files.deleteIfExists(Paths.get("multiple.zip"));
        Files.deleteIfExists(Paths.get("alldir.zip"));
        deleteDirectory(Paths.get("testdir"));
        deleteDirectory(Paths.get("extracted"));
    }

    private static void deleteDirectory(Path path) throws IOException {
        if (Files.exists(path)) {
            Files.walk(path)
                 .sorted(Comparator.reverseOrder())
                 .map(Path::toFile)
                 .forEach(File::delete);
        }
    }
}
ZIP 的特点
- 支持多文件和目录结构
- 可以设置压缩级别(0-9,0不压缩,9最高压缩)
- 支持注释和额外信息
- 需要为每个文件创建ZipEntry
- 保持原始目录结构
6.4 GZIP vs ZIP 对比
| 特性 | GZIP | ZIP |
|---|---|---|
| 文件数量 | 只能压缩单个文件 | 支持多个文件和目录 |
| 目录结构 | 不保留目录结构 | 保留完整目录结构 |
| 压缩率 | 较高(针对单个文件优化) | 中等(考虑多文件平衡) |
| 扩展名 | .gz | .zip |
| 使用场景 | HTTP压缩、日志压缩 | 文件打包、备份 |
| Java类 | GZIPInputStream/GZIPOutputStream | ZipInputStream/ZipOutputStream |
| 加密支持 | 不支持 | 需要第三方库 |
